While most of the Project Managers are well versed with the Project Planning process, many end up being not so efficient at tracking of the Project Plan. In this article I aim to provide a quick guide for the budding Project Managers to be able to make use of the "Auto-Scheduling" and "Baselining" features of Microsoft Project Plan (MPP) to create and track to a plan in an efficient manner.
For the purpose of this article, I will be using MPP 2013. However, the concept will apply equally well to MPP 2010.
Creating an Updatable Plan:
Here I will explain a method that I have followed for years to create plans that are easily updatable at a later stage without too much of manual work. The key here is to avoid constraints that will add in the way of auto-update at a later stage.
Step 1 - Switch on the "Auto Schedule" feature of MPP as shown in the below screenshots


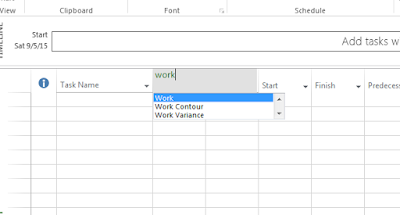
Step 2 - Add a Column for "Work" to the MPP file and call it "Effort"

Step 3 - Set the Project Start Date in the Project Tab -> Project Information -> Start Date field
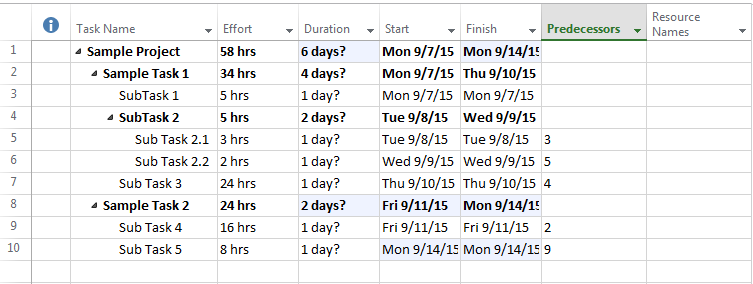
Step 4 - Add all the tasks along with their subtask hierarchy to the "Task Name" column. This will create the tasks corresponding to each entry as shown below.

Step 5 - Add Effort in hours against each of the leaf tasks under the "Effort" column as shown below. The Efforts under the non-leaf tasks will get calculated automatically.

Step 6 - Add sequencing of the tasks by entering the "Predecessors" column values as shown below.

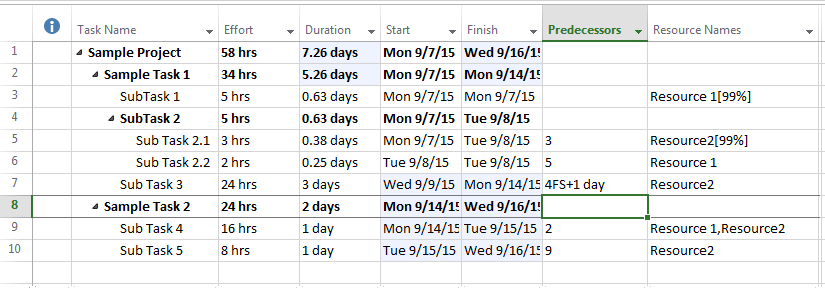
Step 7 - Enter the Resources who will work on each of the tasks under the "Resource Names" column. At this point, the efforts may change to compensate for extra resource allocation. Change the effort to original one if needed. This will make the resource utilization change. Add all the resources without worrying about the utilization.

Step 8 - Adjust the duration to make resource utilization equal 100%. As you change the duration, effort will change to compensate for it. However, a context menu will provide an option to alternatively change resource allocation (as shown below). Select the option to change resource allocation to 100% and retain the original effort.


At this point the plan is ready with no constraints to it. The trick here was to never have to set the Start and Finish dates manually. Since those dates are auto-scheduled, and subsequent changes in the plan will just readjust those dates, without the project manager needing to revisit and rearrange all the tasks.
Adding a Delay to a task
Let us say that Subtask 3 in the above plan gets delayed by 1 day. In that case, the plan can be readjusted simply by changing the duration of Subtask 3 as shown below.

Delaying the Start of a Task
If, for example, Subtask 3 needs to start 2 days later than the original plan, a delay can be added by adding a leading buffer in the predecessor column as shown below.

Note that in all these cases, the plan remains self-adjusting so that the Project Manager can try out various scenarios to choose the best possible plan.
As always, please feel free to provide your comments and questions.
For the purpose of this article, I will be using MPP 2013. However, the concept will apply equally well to MPP 2010.
Creating an Updatable Plan:
Here I will explain a method that I have followed for years to create plans that are easily updatable at a later stage without too much of manual work. The key here is to avoid constraints that will add in the way of auto-update at a later stage.
Step 1 - Switch on the "Auto Schedule" feature of MPP as shown in the below screenshots

Step 2 - Add a Column for "Work" to the MPP file and call it "Effort"


Step 3 - Set the Project Start Date in the Project Tab -> Project Information -> Start Date field
Step 4 - Add all the tasks along with their subtask hierarchy to the "Task Name" column. This will create the tasks corresponding to each entry as shown below.

Step 5 - Add Effort in hours against each of the leaf tasks under the "Effort" column as shown below. The Efforts under the non-leaf tasks will get calculated automatically.

Step 6 - Add sequencing of the tasks by entering the "Predecessors" column values as shown below.
Step 7 - Enter the Resources who will work on each of the tasks under the "Resource Names" column. At this point, the efforts may change to compensate for extra resource allocation. Change the effort to original one if needed. This will make the resource utilization change. Add all the resources without worrying about the utilization.

Step 8 - Adjust the duration to make resource utilization equal 100%. As you change the duration, effort will change to compensate for it. However, a context menu will provide an option to alternatively change resource allocation (as shown below). Select the option to change resource allocation to 100% and retain the original effort.


At this point the plan is ready with no constraints to it. The trick here was to never have to set the Start and Finish dates manually. Since those dates are auto-scheduled, and subsequent changes in the plan will just readjust those dates, without the project manager needing to revisit and rearrange all the tasks.
Adding a Delay to a task
Let us say that Subtask 3 in the above plan gets delayed by 1 day. In that case, the plan can be readjusted simply by changing the duration of Subtask 3 as shown below.

Delaying the Start of a Task
If, for example, Subtask 3 needs to start 2 days later than the original plan, a delay can be added by adding a leading buffer in the predecessor column as shown below.
Note that in all these cases, the plan remains self-adjusting so that the Project Manager can try out various scenarios to choose the best possible plan.
As always, please feel free to provide your comments and questions.


